Posts tonen met het label tutorials. Alle posts tonen

donderdag 19 juli 2018

Very Vintage Bag

Hey, hey!


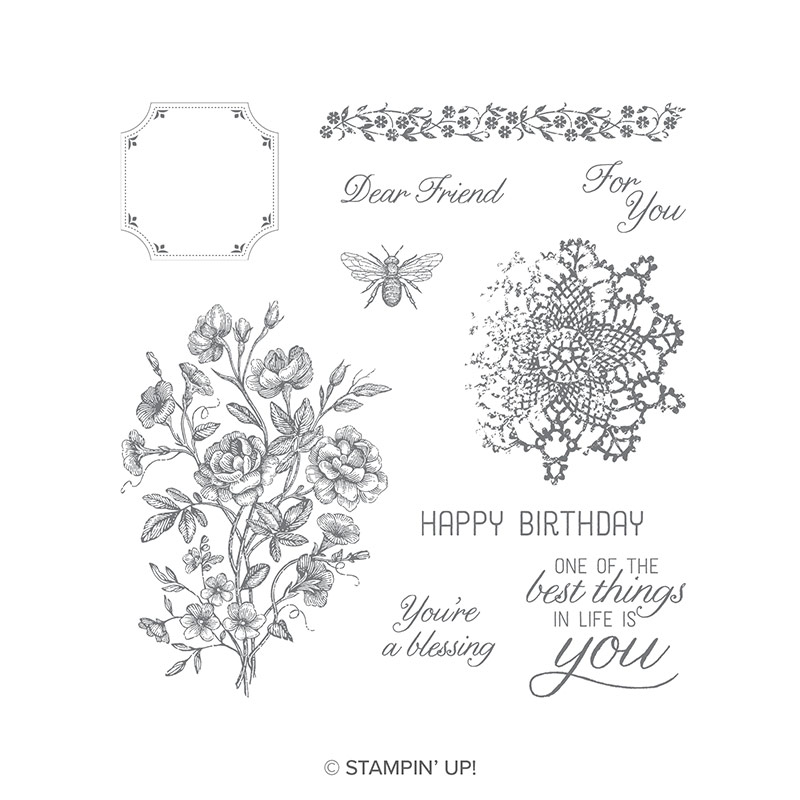
Very Vintage Stamp Set

In de jaarcatalogus staan altijd een paar stempelsets die "Just for Hosts" zijn. Dat betekent dat je ze niet kunt kopen, maar dat je ze kunt verdienen als je een party geeft waar voor € 200 verkocht wordt (exclusief verzendkosten). Je koopt ze met je verdiende Stampin' Rewards.

Toen ik de host stempelset Very Vintage voor het eerst zag, was ik helemaal weg van het bijtje. Ik maak weinig vintage dingen, het past gewoon niet zo bij mijn stijl, maar deze stempels zijn zo mooi dat ik wist dat het wel goed zou komen.
When I first saw the Very Vintage host stamp set, I fell in love with the bee. I don't normally do vintage, it's just not my style, but these stamps are so beautiful that I knew I couldn't go wrong.


Ik besloot een geschenktasje te maken met een losse bovenkant, waarvoor ik de grootste cirkel van de Stitched Shapes Framelits heb gebruikt. Die hebben zo'n sjiek stikrandje extra. De grootste cirkel is wel een aparte maat nl. 2⅞" en dat bepaalde weer de maten van het tasje.
I decided to make a gift bag with a loose top, for which I have used the largest circle of the Stitched Shapes Framelits. They have such an elegant stitched border. The largest circle, however, is an unusual size as it measures 2⅞", which dictated the size of the bag.
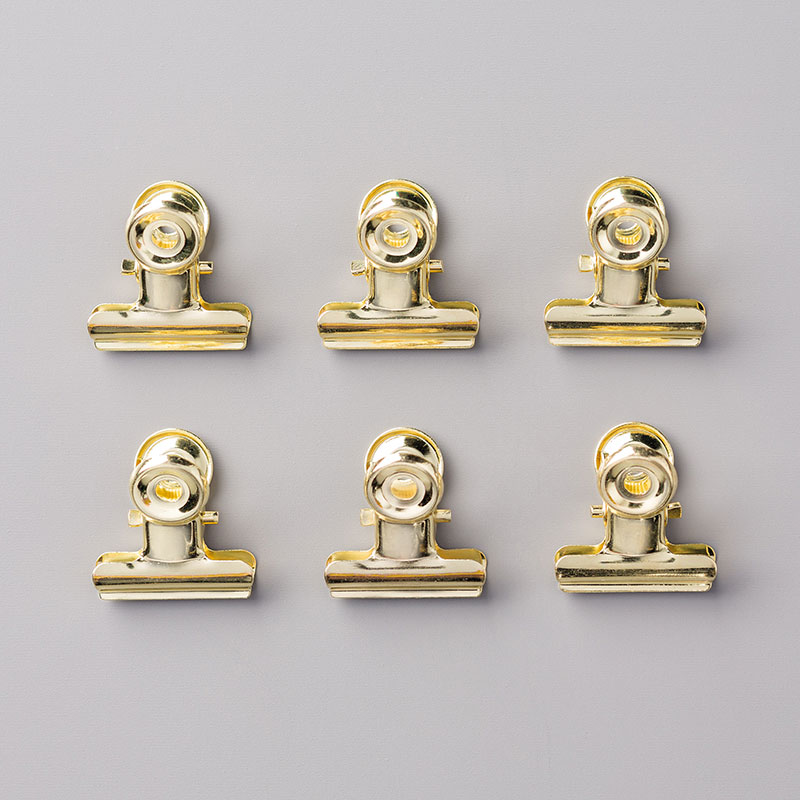
Natuurlijk heeft Stampin' UP! het prachtigste papier, maar voor mijn tasje besloot ik zelf te stempelen. Voor de vintage look heb ik Very Vanilla card stock genomen en gestempeld in Crumb Cake. De sluiting van het tasje is van Crumb Cake card stock. Een Gold Library Clip erop en het is helemaal af.
Of course Stampin' UP! have the most beautiful paper, but for my bag I decided to stamp my own paper. For a vintage look I've used Very Vanilla Cardstock and I stamped in Crumb Cake. The bag topper is in Crumb Cake Cardstock. Add a Gold Library Clip for the finishing touch.


Gold Library Clips


Je kunt het tasje maken van een vel A4 - je snijdt het op maat op 11¼" x 8".
If you work in American A4, you will be able to make this bag to these sizes it just means that you have a narrower glue flap than I am normally comfortable with. I prefer a half inch glue strip.
The paper size is 11" x 8".
Met de lange zijde boven bevinden de rillijnen zich op
2⅞" / 5⅜" / 8¼" / 10¾"
op 4⅛" en op 9½" maak je een rillijn van ongeveer 1¼"
dan keer je het papier en je maakt een rillijn op 2½"
With the long side top you score at
2⅞" / 5⅜" / 8¼" / 10¾"
at 4⅛" and at 9½" you score down to about 1¼"
turn the paper and score at 2½"
Het filmpje hieronder toont je de rest, veel plezier met het kijken.
The video below shows you the rest, have fun watching.


donderdag 12 juli 2018

Case That Card 1


Hey, hey!

In een catalogus van Stampin' Up! zijn zoveel leuke ideeën te vinden. Ik maak wel eens een kaart na, maar hij krijgt toch altijd een draai van mijzelf. Ik begin gewoon met wat kleuren uit te kiezen en dan zie ik wel waar ik uit kom.
Het resultaat is in dit geval beslist kleurrijk te noemen. 


There are so many fun ideas to be found in the catalogue. I do case, but whatever I case always ends up differently. I usually start  by choosing some colours and then I'll just see where it ends.
In this case the result is colourful, to say the least. 


In de video kun je zien hoe ik een kaart als deze maak en krijg je tips voor met de hand uitknippen. Natuurlijk kun je ook de kleuren nemen die in de catalogus staan, in de video heb ik dat gedaan. Veel kijkplezier!

In the video you can see how I make a card such as this one and you will get some tips on fussy-cutting. Of course you can also choose the colours that are in the catalogue, I have done so in the video. Have fun watching!


vrijdag 29 juni 2018

Handmade Frame

Hey hey!

This tutorial shows you how I have made these beautiful frames. I started out by using the Glossy White paper. The gloss fools anyone into thinking it is a real frame and the frames look just beautiful.

I give credit to Jodi of HappyHouseCreates who shared her idea to make these frames in almost any size (normally with a shadow box type frame the paper size limits your options rather). I just couldn't get the corners to fit neatly, brooded on this for a day or two and made an improvement on her idea. 

You can see the corner gapes

And here you can see the improved version

Neat Corners
Here are some directions on sizes:

First you decide how large your background will be. In this case the image is on a die cut made with the second largest square Stitched Shape Framelit. This measures 2⅛' x 2". I wanted roughly 1½" background around it, which comes down to a 3½" x 3½" square for my back ground.

The frame itself, when stuck together is 1" wide, so to calculate what paper size to cut, you add 2" to your measurements (one inch for each side). And here comes my improvement: you add another ½" which will make the extra little flap.  
You can make frames like this in many more sizes.

In the video you can see a tutorial, I hope you enjoy it.


Because I had run out of Glossy White, I decided to make some frames in our regular Card Stock I couldn't get enough of making them and I had already made the back grounds and the hand-coloured images from Bella & Friends and Pretty Kitty. And you know what? These are really beautiful too.


I hope you have enjoyed watching my very first video tutorial, no doubt I have things to learn still and I look forward to receiving your comments. 


woensdag 20 juni 2018

Pop-up Box Card

Hey hey!

My youngest brother is a part-time bee keeper and totally into bee-related things. So I always make him something for his birthday that is.
When I saw the base model for a pop-up box card at easypeasyandfun, I immediately thought I'd adapt it for my own purposes. In this case I re-sized all measurements. If bees are not what you need, it will be easy to change the decoration to get a fun result.

The stamp sets used are A Little Wild with the matching Little Loves Framelits and Jar of Love with the matching Everyday Jars Framelits. The jar lid is from Sharing Sweet Thoughts (retired) because I like the gingham look, but you could use the lid from Jar of Love.

When I had finished the card, I realised it would not fit into our standard C6 envelope, which I had intended, but because I wanted my jar of honey to be well visible, it turned out a little bit too high. That was no problem, I took my Envelope Punch Board and made a perfectly sized envelope. I took a 9" x 9" piece, scored at 4¼".
However, if you do want your pop-up box card to fit, make sure the pop-up doesn't pop up too much. (Try saying that a couple of times in a row.)

For the box you need two pieces of 3" x 6½".
You need a strip of 1¾" x 7½" and another strip of 1" x 6" for the pop-up mechanism.
I stamped on one side of all the pieces of Card Stock because I didn't want the inside to look bare.

To make the box, take the two 3" x 6½" pieces and score.
Cut a slight wedge off the flaps, fold and burnish with your bone folder and glue the box together on one side. The stamped sides are on the inside.


If you want to decorate your box with panels, now is the time you can adhere them easily. My panels are cut " smaller than the panel they will go on.

After adhering the panels, stick down the other flap and form a box that looks like this.
Now it's time for the pop-up mechanism. Take the 1¾" x 7½" strip and first make two score lines, flip the paper and make a score line in the middle. Doing it like this will give neater folds.


Now you can stick one side of the mechanism down to begin with. Make sure you adhere it between what will be the front and back of the box.

Remove the paper backing from the Tear & Tape and stick the mechanism down as shown.

Remove the backing again, hold the mechanism flat and push the box down onto its back. This leaves you with a box that looks like this.
Take the 1" x 6" strip and insert it in the fold. Do not use glue as yet, you want to measure the correct length first.

Fold the box flat and put the embellishment on top of the strip, again no glue as yet. Remove both strip and embellishment, flip over and draw a pencil line where you want to shorten the strip.

Put glue on the back of the strip ( the non-stamped side is the back) and stick it down, into the fold.

Adhere the embellishment to the protruding part of the strip.


For a nice finish, you can stick another embellishment on the back.
When pushed into a box, the embellishment will disappear into it. When pushed flat, the embellishment will pop up.

zaterdag 9 juni 2018

Tips voor ronde doosjes / Tips for rounded boxes

Hey hey!


Vroeger maakte ik ronde doosjes, maar ik was nooit echt tevreden. Met het papier van Stampin' UP! en Tear & Tape krijg ik een veel mooier resultaat. In deze tutorial geef ik je een paar tips om zelf een leuk ovaal doosje te maken.  

I used to make round boxes, but I was never really happy with them. With the Stampin' UP! paper and Tear & Tape I get much better results. In this tutorial I will give you some tips to make such a cute oval box yourself.

Centimeters
Inches
doosje: 1 strook 26 x 7 cm, ril op 6 cm
box: 1 strip 10¼" x 2¾", score at 2⅜"
deksel: 1 strook 26 x 3,5 cm, ril op 2,5 cm
lid: 1 strip 10¼" x 1⅜", score at 1"
4 keer de grootste van de Layering Ovals Framelits uitgesneden (twee zijn voor de bodem en het deksel, twee voor afwerking aan de binnenkant van de bodem en het deksel)
4 times die cuts of the largest of the Layering Ovals Framelits (two are for the bottom and lid, two for a liner of the bottom and the lid)

Voor zowel het doosje zelf als het deksel is de werkwijze hetzelfde.
This same method is used for both the box and the lid.

Breng Tear & Tape aan op de plakstrook en aan de rechterkant. Ik zet een hulplijntje op de papierstrook zodat ik niet te ver inknip. Dan kun je later de papierstrook in één stuk eraf trekken.
Adhere Tear & Tape on the flap and on the right. I draw a line on the backing to help me cut not too far up the flap. This will allow you remove the backing in one go later.


Knip aan de linkerkant een stukje van de plakstrook af, ongeveer 1,3 cm. Als daar geen tandjes zitten, kun je de rand beter sluiten.
On the left of the flap, cut off a small piece, about ½". If there are no teeth there, it will be easier to make the join.


Knip de plakstrook in, niet te ver inknippen want dan moet je de papierstrook van ieder tandje afhalen. Ik knip eerst in de ene richting en dan in de andere richting. In foto 4 zie je het resultaat.
Cut into the flap, don't indent too far because then you will have to remove the backing of each tooth. I cut in one direction first and then in the other direction. In photograph 4 you can see the result.


Krul de strook voorzichtig met jevouwbeen zodat je hem makkelijker kunt plakken.
Gently curl the strip using your bone folder to make the strip easier to stick down.


Neem een van de gestanste ovalen, verwijder een stuk van de papierstrook en begin te plakken waar je later de las wilt hebben. Plak steeds een stuk, verwijder weer wat papierstrook enz.
Take one of the die cut ovals, remove a piece of the paper backing and start where you want the join to be later. Repeat this piece by piece, remove some backing, adhere etc.


Belangrijk! Als je een stuk van de papierstrook hebt verwijderd, voordat je gaat plakken, knip je de tandjes verder in, tot aan de rillijn. Plak dan een stuk van de strook vast. Doe dit steeds in delen, dan kan het papier meebuigen met het ovaal.
Important! Once you have removed part of the paper backing, before adhering, cut into the teeth further all the way up to the score line. Then adhere part of the strip. Do this stretch by stretch so that the paper can bend along the oval.


Uiteindelijk houd je een stukje over zonder tandjes, dat wordt over het al bevestigde papier geplakt. Verwijder de papierstrook en zet het laatste stukje vast.
In the end you will have left a piece with no teeth to be stuck on top of the piece you started with. Remove the backing and adhere the final piece.


Druk alle plakstroken goed vast met het vouwbeen.
Use your bone folder to press down the flaps.


Om de binnenkant af te werken, kun je er een ovaal in leggen. Meestal is het nodig om aan één kant er een stukje af te knippen om het te laten passen.
If you want to tidy up the inside, you can insert an oval. You usually have to cut off a sliver on one side to make it fit.


woensdag 16 mei 2018

Geschenkdoos voor kaarten met magneetsluiting / Gift box for cards with magnetic closure

Hey hey!


Wanneer ik kaarten weggeef voor een verjaardag of wanneer ik op bezoek ga, merk ik dat de ontvanger blij verrast en enthousiast is. Ik heb een geschenkverpakking gemaakt om het geheel af te maken. In deze geschenkdoos passen kaarten en enveloppen; ik doe bij een kaart altijd een versierde envelop. De doos sluit met magneetjes zodat hij ook mooi dicht blijft.


I have noticed that whenever I gift someone cards as a thank you or for a birthday present that I get surprised and enthusiastic reactions. To complete everything, I have made a gift box. This box holds cards and envelopes; I always give a decorated envelope with a card. The box closes neatly with some small magnets.
 

De doos kan gemaakt worden met Specialty Designer Series Paper of card stock dat met matten versierd wordt. Je kunt ook card stock gebruiken en dat zelf bestempelen.

You can use Specialty Designer Series Paper or card stock decorated with mats, or you could even stamp on the card stock yourself.


Maten
Measurements
doos: een stuk van 24,2 x 19,4cm
box: a piece of 9½" x 7⅝"
rechterflap: 12,7 x 15,9cm
right flap: 5" x 6¼"
linkerflap: 12,7 x 19,1cm
left flap: 5" x 7½"
De flappen zijn iets breder dan de doos zodat ze erbovenop blijven liggen.
The flaps are slightly wider than the box so they will lie on top.

Als je de doos wilt versieren met matten, zijn dit de maten en de aantallen
If you want to decorate the box with mats, here are the dimensions and quantities
twee matten linkerflap 12,3 x 11,4 cm 
twee matten rechterflap 12,3 x 8,3 cm 
twee matten zijkant flap 12,3 x 1,5 cm 
two mats left flap 4⅞" x 4½"
two mats right flap 4⅞" x 3¼"
two mats sides 4⅞" x ⅝"

Hoe ga je te werk? How to go about it.

Maak eerst een versterkte doos voor de kaarten. Ril het stuk van 24,2 x 19,4 cm rondom op 1,9 en 3,8 cm. Vouw rillijnen en loop na met vouwbeen. Knip alle hoeken zoals op de foto.
First make a reinforced box for the cards. Score the 9½" x 7⅝" piece score all around at ¾" and 1½". Fold all score lines and reinforce with bone folder. Cut all corners as in photograph.


Plak Tear & Tape op de buitenste hoekjes, draai om en plak Tear & Tape op de stroken, zoals op de foto. Het stukje Designer Series Paper dat je op de bodem ziet, had ik over en in plaats van het weg te gooien heb ik het passend gesneden en op de bodem geplakt.
Apply Tear & Tape to outer small corners, turn over and apply Tear & Tape to the flaps, as in photograph. The piece od Designer Series Paper that you see on the bottom is a left-over that I've cut to size and used instead of throwing it away.


Verwijder papierstrook van hoekjes en plak eerst hoekjes netjes uitgelijnd aan de zijkant vast.
Remove paper backing from corners and first adhere small flaps neatly to the sides.


Verwijder papierstrook van een lange zijde en vouw strook naar binnen. Loop goed na met vouwbeen. Doe dan andere lange zijde en herhaal bij andere zijden. Dit is dan de doos voor de kaarten.
Remove paper backing from one long side and fold inwards. Reinforce well with bone folder. Then do the other long side and repeat with all sides left. This completes the box for the cards.


Neem rechterflap (12,7 x  15,9 cm) en ril op 5,1 en 7,15 cm, doe hetzelfde met de linkerflap. De tweede maat is ingewikkelder, maar bij 7,1 is de rand te krap en bij 7,2 te wijd. Ril er dus ertussen in. (Zie de foto.)
Take right flap (5" x 6¼") and score at 2" and at 2¾" + 1/16". Do the same with the left flap. The second measure looks more complicated, but if you don't add the 1/16" the side will be either too narrow or too wide. (See photograph)


Als je met matten wilt versieren, plak ze er dan nu op. Plak de smalste mat op wat de buitenkant van de doos wordt, naast de andere mat. Aan de binnenkant van de flap plak je één mat.
If you want to decorate using mats, adhere them now. Stick the narrowest mat on what will be on the outside of the box, next to the other mat. On the inside you adhere one mat.


Plak doos op flappen, vergeet niet dat flappen breder zijn dan doos dus plaats doos goed vanuit het midden. Gebruik TomBow Multi Purpose Liquid Glue, dan kun je nog wat schuiven. Laat goed drogen voordat je de andere flap doet.
Adhere box to flaps, remember flaps are wider than box so place neatly in middle. Use Tombow Multipurpose Liquid Glue, this allows you a few moments to adjust the placement. Allow to dry well before adhering the other flap.


Plak stuk van 12,7 x 16,6 cm op bodem op buitenkant van doos voor nette afwerking. 
Adhere 6½" x 5" piece to outside bottom for neat finish.


Plak op rechterflap aan binnenkant twee magneetjes met Glue Dots - ongeveer 2 cm uit de rand.
Adhere two small magnets to inside of right flap using Glue Dots - about ¾" from edge.


Sla flap naar binnen en leg er twee magneetjes op. Op deze manier hoef je je geen zorgen te maken over + of - zijde van de magneetjes. Ze gaan vanzelf goed op elkaar liggen.
Fold flap inwards and put two magnets down. This way you will have no trouble with polarisation, they will naturally lie down in the right way.


Doe Glue Dot op magneetjes en leg bijvoorbeeld tijdelijk je Snail onder de flap zodat je goed kunt aandrukken. Sla dan linkerflap naar binnen en druk goed aan zodat magneetjes op flap vastzitten. Licht flap op en druk met de hand alle magneetjes nog eens goed vast.
Put a Glue Dot on magnets and temporarily put something under the flap, your Snail e.g. so that you can press down well. Then fold left flap inwards and press down well to adhere magnets. Lift flap and press down well on all magnets by hand.


Ik werk de magneetjes weg met rondjes van de ¼" Circle Punch die ik bevestig met een Glue Dot.
I to hide the magnets with punched circles from the ¼" Circle Punch adhered with a Glue Dot.