Posts tonen met het label handgemaakt doosje. Alle posts tonen

vrijdag 4 oktober 2019

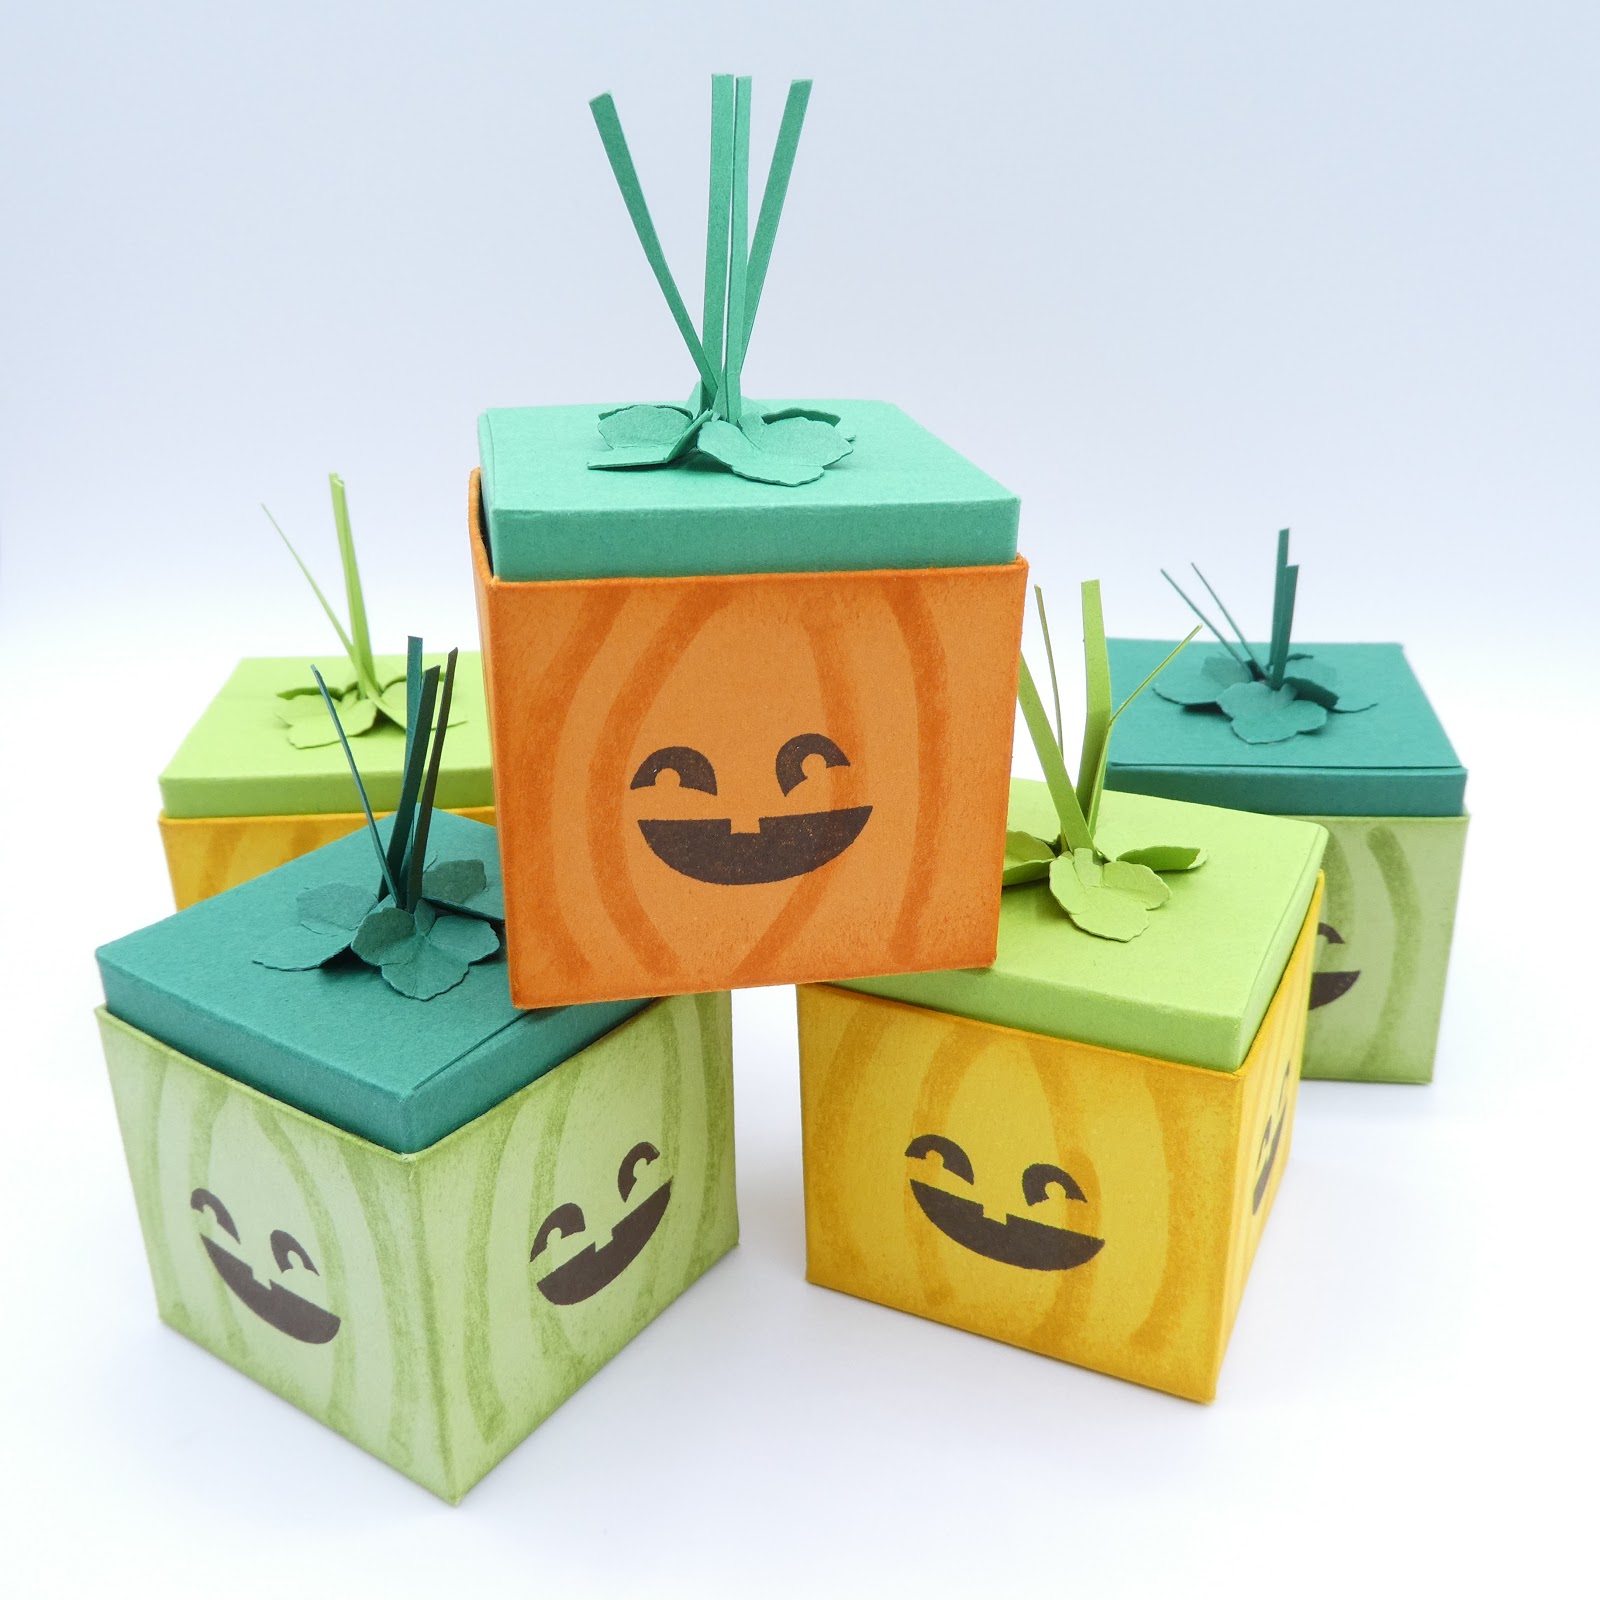
Vierkante pompoenen / Square Pumpkins


Hey, hey!
Hoe vind je mijn vierkante pompoenen? Deze blogpost gaat er ook over hoe je vanuit een fout een briljant idee krijgt.
How do you like my square pumpkins? This blog post is also about how you can turn a mistake into a brilliant idea.


Kijk maar eens naar deze foto. De lila pompoen is het prototype. Daar was ik tevreden over, toen ben ik gaan snijden, vouwen, stempelen, sponge dauberen en ga maar door. In veelvoud. Totdat ik bij het in elkaar zetten van de dekseltjes ontdekte dat ik het gezichtje ondersteboven had gestempeld. Bij álle deksels.
Just have a look at this picture. The lilac pumpkin is my prototype. I was happy with that, so started cutting, folding, stamping, sponge daubering and so on. Multiples. Until I discovered when assembling the lids that I had stamped the face upside down. On all lids.
Ik heb besloten mijn doosjes dan maar om te keren en van de bodem het dekseltje te maken. En ik vind ze nog leuker zo ook! Nou ja!
I then decided to upend my boxes and make the lids into the bottoms. And guess what, I like them even better like this!


Bodem
Bottom
cardstock 20,3 x 13 cm
lange zijde boven, ril op 4,75 / 9,5 / 14,3 / 19,1 cm
korte zijde boven, ril op 4,75 / 8,9 cm
cardstock 8" x 5⅛"
long side top, score at 1⅞" / 3¾" / 5⅝" / 7½
short side top, score at 1⅞" / 3½"


Deksel
Lid
cardstock 19,7 x 13,8 cm
lange zijde boven, ril op 4,65 / 9,2 / 13,8 / 18,4 cm
korte zijde boven, ril op 4,65 / 9,2 cm
cardstock 7¾" x 5-7/16 (= just a bit under 5½")
long side top, score at 1-13/16" / 3⅝" / 5-7/16" / 7¼
short side top, score at 1-13/16" / 3⅝"
Het stukje rechts is handig als je in inches werkt, met centimeters en millimeters heb je dit probleem niet.
FOOLPROOF WAY TO DEAL WITH 16th inches:
long side top, first score at 3⅝" and 7¼" then move cardstock to the right and score at 1⅞" and 5½"
short side top, first score at 3⅝" then move cardstock to the right and score at 1⅞"


First score the "normal" dimensions 3⅝" and 7¼"


Move your paper to the right like this and put in the score lines at 1⅞" and 5½"


Ik heb de onderstaande kleurencombinaties gebruikt / I have used the colour combinations listed below
Crushed Curry & Granny Apple Green
Pumpkin Pie & Call Me Clover
Pear Pizzazz & Shaded Spruce
Gezichtje is uit Fall Fest (niet meer in de collectie - Harvest Hellos is een alternatief in de Herfst/Wintercatalogus op blz. 49)
The face is from Fall Fest ( retired - Harvest Hellos is an alternative that is in the Autumn/Winter Catalogue on page 49)


vrijdag 13 september 2019

Iemand vleermuismelk? / Bat Milk, Anyone?


Hey, hey!
Ik denk dat ik een nieuw zuivelproduct uitgevonden heb: Vleermuismelk. ( Ik heb het gegoogeld en een vleermuis is nog echt een zoogdier ook!) Als je je thee met melk drinkt, net als ik, is dit het ultieme ding voor Halloween?
I think I have invented a new dairy product: Bat Milk. (I've Googled it and bats are actually mammals. Well, what do you know?) If you drink your tea with milk, as I do, is this perfect for Halloween?
In eerste instantie wild ik de grafsteentjes van de Monster Bash Enamel Shapes gebruiken als versiering van dit melkpak(je). Maar, eentje zag er vreemd uit en om er nu vier op een melkpak te plakken was nu ook weer niet praktisch voor iets dat ik gewoon weggeef. Ja, ik weet het. Ons benne zûûnig. Dus uiteindelijk heb ik zelf maar grafsteentjes ontworpen en gemaakt.
Initially, I wanted to use the gravestones in the Monster Bash Enamel Shapes to decorate this milk carton. However, one did not look right and four per carton would make it impossible to have the carton as a Trick or Treat give-away. I know, I'm frugal that way. So I ended up designing and making my own mini-gravestones.


Je kunt uit een vel Very Vanilla Thick papier twee melkpakjes maken. De plakflap is ietsje smaller, maar het werkt. Je snijd het papier 14,8 x 15,2 cm. Ik snijd er eerst in de lengte 5,7 cm af en dan snijd ik de rest over de helft op 14,8.
From one sheet of Very Vanilla Thick cardstock you can get two cartons. The glue flap is narrower, but it works. You cut your paper 5⅞" x 6". I cut off a strip of 2¼" lengthwise first and then I cut the rest in half at 5⅞".
Met de 14,8 zijde boven, ril op 3,5 / 7,0 / 10,5 / 14,0 cm.
Kwartslag draai (de smalle strook ligt rechts) ril op 3,5 / 11,1, keer het papier om en ril op 14,0 cm.
With the 5⅞" side top, score at 1⅜" / 2¾" / 4⅛" / 5½".
Quarter turn  and (with the narrow strip on the right) score at 1⅜" / 4⅜", flip the paper and score at 5½".


Leg het papier weer met de 14,8 zijde en het smalle deel boven. Je hebt nog twee korte rillijnen nodig tot aan de eerste rillijn. In centimeters zijn ze makkelijker te zetten dan in inches. Zet de rillijnen op 5,2 en 10,6 cm.
Van daaruit kun je de schuine rillijnen maken.
Put the paper back with the 5⅞" side and the narrow part at the top. You need two short score lines from the top as far as the first score line. These are awkward measurements, you need a score line at 2-1/16" and at 4-3/16". These dimensions are not on your Simply Scored, but I have devised an easy way around this: on your Simply Scored, slide the paper a fraction (1-16") to the right and put your score lines at 2⅛" and 4⅞".
From there on you can make the diagonal score lines.
Stempelsets / Stamp Sets
To Every Season
Nature's Beauty
Classic Stampin' Pads
Gray Granite
Mossy Meadow
Soft Suede
Pineapple Punch
Diversen / Miscellaneous
1½" Circle
Detailed Trio
Sponge Daubers
Journaling Pen 0,5
Tear & Tape Adhesive
Stampin' Dimensionals


donderdag 29 augustus 2019

Spooktacular Mummyknabbeltjes / Spooktacular Mummy Munchies


Hey, hey!
Een doosje voor mummies. Die hebben vast zin in een knabbeltje wanneer ze opstaan uit het graf. Geef ze wat te eten, want anders ….
The perfect box for Trick & Treating. Mummies must have the munchies on when they rise. You'd better feed them, or….


Met de Spooktacular Bash stempelset en de Ornate Frames maak je zo iets om hun honger te stillen. Wat mummiewikkels eromheen en ze zullen dol zijn op dit doosje!
The Spooktacular Bash stamp set and the Ornate Frames easily make something to still their hunger. Add some mummy wrappings and they will love this box!
Het doosje
The box
Very Vanilla thick cardstock 19 x 14,6 cm
Very Vanilla thick cardstock 7½" x 5¾"
lange zijde boven, ril op 3,8 / 8,9 / 12,7 / 17,8 cm
long side top, score at 1½" / 3½" / 5" / 7"

korte zijde boven, ril op 3,8 / 9,5 / 13,3 cm
short side top, score at 1½" / 3¾" / 5¼"
Gebruikte materialen / Materials used
Spooktacular Bash
Ornate Frames
½" Circle punch
Stamping Sponge
Sahara Sand Classic Stampin' Pad
Stampin' Blends Pumpkin Pie Light & Dark
Stampin' Blends Granny Apple Green Light & Dark


donderdag 8 augustus 2019

Doosje voorCadeaulabeltjes / Box for Gift Labels


Hey, hey!
Van allerlei restjes papier had ik een hele boel cadeaulabeltjes gemaakt, zo veel dat ik besloot ze dan zelf ook maar cadeau te doen. En daarvoor heb ik dit lieve doosje ontworpen.
I had been making a great many gift labels from all my scraps, I had so many that I decided to make gifts of these labels themselves. And I designed this cute box for them to give them away in.


De bodem
The bottom
een stukje cardstock van 14 x 18,4 cm
a piece of cardstock measuring 5½" x 7¼"
lange zijde boven, ril op 1,9 / 3,8 / 14,6 / 16,5 cm.
korte zijde boven, ril op 1,9 / 3,8 / 10,2 / 12,1 cm.
long side top, score at ¾" / 1½" / 5¾" / 6½".
short side top, score at ¾" / 1½" / 4" / 4¾".


Het manchet
The sleeve
een stuk Designer Series Paper van 11,1 x 18,1 cm.
a piece of Designer Series Paper  of 4⅜" x 7⅛"
lange zijde boven, ril op 1,2 / 7,8 / 9,7 / 16,1 cm.
long side top, score at ½" / 3-1/16" = -3⅛" /
3-13/16" = +3¾" / 6-5/16" = +6¼"


Voering bodem
Liner for the bottom
een stukje Designer Series Paper van 6,2 x 10,7 cm.
a piece of Designer Series Paper of 2-7/16" = -2½" x 4-3/16" = -4¼"
En als laatste een stukje lint van ongeveer 10 cm.
And lastly a piece of ribbon of approx. 4".


vrijdag 19 juli 2019

Mosaic Mood Geschenkdoosje / Mosaic Mood Gift Box


Hey, hey!
Zoals je weet, ben ik bezig met opwerken van mijn voorraad Designer Series Paper om plaats te maken voor het nieuwe papier. Ik heb weer een doosje gemaakt waarvoor een vel papier van 30,5 x 30,5 nodig is. Dat helpt.
You know that I'm on a mission to work up my hoard of Designer Series Paper to make room for the new paper. Again I've made a box that uses a 12" x 12" sheet of paper to make sure I do.
Ik kon het natuurlijk niet laten om toch ook nieuw papier te gebruiken - dat moet ook op, toch?
Of course I just had to use some new paper as well - this shouldn't end up in my hoard either, should it?
Het doosje is 13,5 cm hoog en is 7 x 7 cm. Je kunt het plat gevouwen bewaren, je kunt ook de bodemflap vastplakken voor de stevigheid.
The box is 5¼" high and measures 2¾" x 2¾". It folds flat, but of course you can stick down the bottom flap for extra sturdiness.
Je begint met een stuk papier van 29 x 30,5 cm. Als het een patroon heeft dat ertoe doet, d.w.z. herkenbare afbeeldingen, wil je niet dat deze ondersteboven komen te zitten. In dat geval snijd je je papier zoals ik je laat zien in het filmpje.
You start out with an 11½" x 12" sheet. If your paper has a pattern that matters, i.e. when it has recognisable images, you don't want them upside down. In that case you cut the paper the way I'm showing you in the tutorial.  
Met de 29,5 kant boven, ril op 1,5 / 8,5 / 15,5 / 22,5 cm.
Draai het papier een kwartslag en met de rillijn van 1,5 cm boven, ril op 1,5 / 8,5 / 22 / 29 cm.
With the 11½" side top, score at ½" / 3¼" / 6" / 8¾".
Quarter turn the paper and with the ½" score line top, score at ⅝" / 3⅜" / 8⅝" / 11⅜".


Ik heb met de ½" Circle Punch de inkeping gemaakt. 

Als je het doosje wilt versieren met matten, heb je er twee nodig van 6,4 x 6,4 cm, voor de boven- en onderkant.
Snijd vier matten van 12,4 x 6,4 cm voor de zijkanten. Zie mijn tips in het filmpje hoe je ervoor kunt zorgen dat het patroon mooi doorloopt. 
I've used the ½" Circle Punch to make the notch. 

If you want to decorate your box with mats, you will need two mats measuring 2½" x 2½",  for the top and bottom.
Cut four mats measuring 5" x 2½" for the sides of the box. Please watch the tutorial for tips on how to get a continuous pattern. 
BONUS
In het filmpje zie je ook kleinere doosjes, de maten daarvoor staan hieronder.
In the tutorial you can see smaller boxes too, the dimensions for them are below.
Doosje 7,5 cm hoog
Box height 3"
Papier 24,5 x 29,5 cm.
De 29,5 zijde is hetzelfde.
Met de 24,5 cm zijde boven, ril op 1,5 / 8,5 / 16 / 23 cm.
Paper 9¾" x 11½.
The 11½" side is the same.
With the 9¾" side top, score at ⅝" / 3⅜" / 6⅜" / 9⅛".
Doosje 5 cm hoog
Box height 2"
Papier 22 x 29,5 cm
De 29,5 zijde is hetzelfde.
Met de 22 cm  zijde boven, ril op 1,5 / 8,5 / 13,5 / 20,5 cm.
Paper 8¾" x 11½".
The 11½" side is the same.
With the 8¾" side top, score at ⅝" / 3⅜" / 5⅜" / 8⅛".


zaterdag 15 juni 2019

Flip-top Box


Hey, hey!
Deze keer een doos waar je zelfgemaakte kaarten in kunt bewaren. Zo'n doos geef ik weg aan mensen die bij mij kaarten komen maken.
Today I have a box in which you can keep handmade cards. I give these boxes to guests who come over to my house to make cards.
Ik gebruik daarvoor ook vaak papier dat niet meer in de collectie zit, dat is te mooi om niet op te maken.
I often use retired paper for this, it's too beautiful not to use after all.
Wat heb je nodig?
What do you need?
Voorkant
1 vel cardstock  27,9  x 17,2 cm
korte zijde boven rillen op 5,7 cm
lange zijde boven rillen op 5,7 en 22,2 cm
Front
1 piece of 11"  x 6¾" card stock
short side top, score at 2¼"
long side top, score at 2¼" and 8¾"
Achterkant en flip-top
1 vel cardstock 27,9 x 20,9 cm
korte zijde boven rillen op 2,2 en 18,7
lange zijde boven rillen op 5,7 / 17,1 / 22,8 cm
Back and flip-top
1 piece of 11" x 8¼" card stock
short side top, score at ⅞" and 7⅜"
long side top, score at 2¼" / 6¾" / 9"

Als je met matten wilt versieren heb je een vel Designer Series Paper  nodig van 30,5 x 30,5 cm gesneden in:
2 stukken 15,2 x 10,1 cm (voor- & achterkant)
1 stuk 15,2 x 4,4 cm (bovenkant)
1 stuk 15,2 x 3,8 cm (flap voorkant)
2 stukken 10,1 x 4,4 cm (zijkanten)


If you want mats to decorate, you need a piece of 12" x 12" Designer Series Paper cut into:
2 pieces 6" x 4" (front & back)
1 piece 6" x 1¾" (top)
1 piece 6" x 1½" (flap on front)
2 pieces 4" x 1¾" (sides)

Om de binnenkant te versieren - naar keuze: 
1 stuk 15,2 x 10,1 cm (achterkant)
1 stuk 15,2 x 4,4 cm (bovenkant)
1 stuk 15,2 x 3,8 cm (flap)
To decorate the inside - optional:
1 piece 6" x 4" (back)
1 piece 6" x 1¾" (top)
1 piece 6" x 1½" (flap)
Ongeveer 40 cm lint.
About 16" of ribbon.