|
Als je dit doosje wilt maken, klik dan rechts bovenin om naar
mijn webwinkel te gaan. Onderaan vind je een lijst met de gebruikte
materialen.
|
|
|
Hey, hey! |
|
|
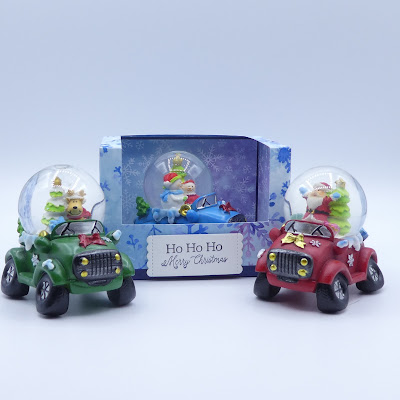
Ik had deze geinige autootjes gekocht als
kerstgeschenkjes. Ze doen me denken aan mijn jeugd in de jaren '60.
Natuurlijk gaan die niet zomaar ergens in, ik maak er een doosje voor. |
I had bought these cute
cars for Christmas gifts. They remind me of my childhood in the sixties. Of
course I won't stick my gifts in any old bag, I want cute packaging for them
as well. |
|
Wanneer ze bij The Antiques Roadshow speelgoed meenemen,
dan is het altijd: "de oorspronkelijke verpakking is ook
belangrijk". Nou, ik heb een jaren '60 doosje ontworpen, zoals op tv. |
You know, when on The
Antiques Roadshow people bring toys along, it's always "the original box
is also important". Well, I have decided to design a 60's-style box, as
seen on tv. |
|
Designpapier matten voor de voering van de bodem |
Designer Series Paper mats for interior of the
bottom |
|
2 matten 7,3 x 7,9 cm 1 mat 7,3 x 10,5 cm 1 mat 10,5 x 7,9 ( voor de bodem) |
2 mats 2⅞" x 3⅛" 1 mat 2⅞" x 4⅛" 1 mat 4⅛" x 3⅛" ( for
the bottom) |
|
Bodem van het doosje |
Bottom part of the box |
|
snijd twee stukken kaartkarton van 12,7 x 20,3 cm met de lange zijde boven, ril op 10,8 en 19 cm met de korte zijde boven, ril op 5,1 cm |
cut two pieces of
cardstock measuring 5" x 8" long side top, score
at 4¼" and 7½" short side top, score
at 2" |
|
Op een van de twee helften: zet
potloodlijntjes 1,9 cm vanuit de bodem en 0,9 cm vanuit de zijkanten. Snijd
een sleuf langs de 1,9 cm lijn. Laat de andere totdat het doosje in elkaar
zit. |
On one of the two
only: put pencil lines ¾" from
the bottom and ⅜" from the sides. Cut a slit along the ¾" line. Do not cut the other
lines until you have assembled the bottom. |
|
Vouw en loop alle rillijnen na, zet beide helften aan
elkaar. Plak de matten op de zijkant en zet de bodem van de doosje in elkaar. |
Fold and burnish all
score lines, adhere the two halves. Adhere the side mats and assemble the
bottom part of the box. |
|
Knip de voorkant weg, plak de achterkant en de bodem in
het doosje. |
Cut away the front
panel, adhere the back mat and the bottom mat. |
|
Deksel |
Lid |
|
Designpapier 27,4 x 24,9 cm |
Designer Series Paper 10⅞" ‾ x 9⅞" ‾ (by which I mean you cut 1/16th"
smaller) |
|
Ril rondom op 1,2 en
8,3 cm. Vouw alle rillijnen. |
Score on all for sides at ½" and 3¼". Fold
all score lines. |
|
Snijd een rechthoek
uit, 2,5 cm van de bodem en 1,2 cm vanuit de andere drie zijden. |
Cut out a rectangle 1" from the bottom and
½" from the other three sides. |
|
Knip en zet het deksel
in elkaar. |
Cut and assemble the lid. |
Gebruikte materialen / Materials used: |
|||||
|
kaartkarton |
Night of Navy, Pear Pizzazz, Real Red |
cardstock |
|||
|
extra stevig kaartkarton |
Whisper White |
thick cardstock |
|||
|
Designpapier
|
Heart Warming Hugs Winterpracht / Snowflake Splendor |
Designer Series
Paper
|
|||
|
stempelset |
Little Treats |
stamp set |
|||
|
stansen |
Snoepdoosjes / Little Treat Box |
dies |
|||
|
lijm |
Mini Plakpuntjes /
Mini Glue Dots, Multifunctionele Vloeibare Lijm / Multi-purpose Liquid Glue, Seal+
Lijmroller / Stampin' Seal+, Tear &Tape Plakband / Tear
& Tape Adhesive, Witte Stampin' Dimensionals White |
adhesive |
|||
|
gereedschap |
Vouwbeen / Bone
Folder, Transparantblok / Clear Block: C, Stans- en Embossing Machine /
Stampin' Cut & Emboss Machine, Rasterpapier / Grid Paper, Heat Tool, Papierschaar
/ Paper Snips, Papiersnijmachine / Paper Trimmer, Simply Scored Riller / Simply Scored Scoring Tool, Simply Shammy |
tools |
|||
|
versiering |
Transparant Embossingpoeder / Clear Stampin' Emboss Powder |
embellishment |
|||
|
inkt |
Klassiek
Inktkussen / Classic Stampin' Pad in: Garden Green Night of Navy Real Red |
ink |
|||


Geen opmerkingen:
Een reactie posten