vrijdag 23 juli 2021

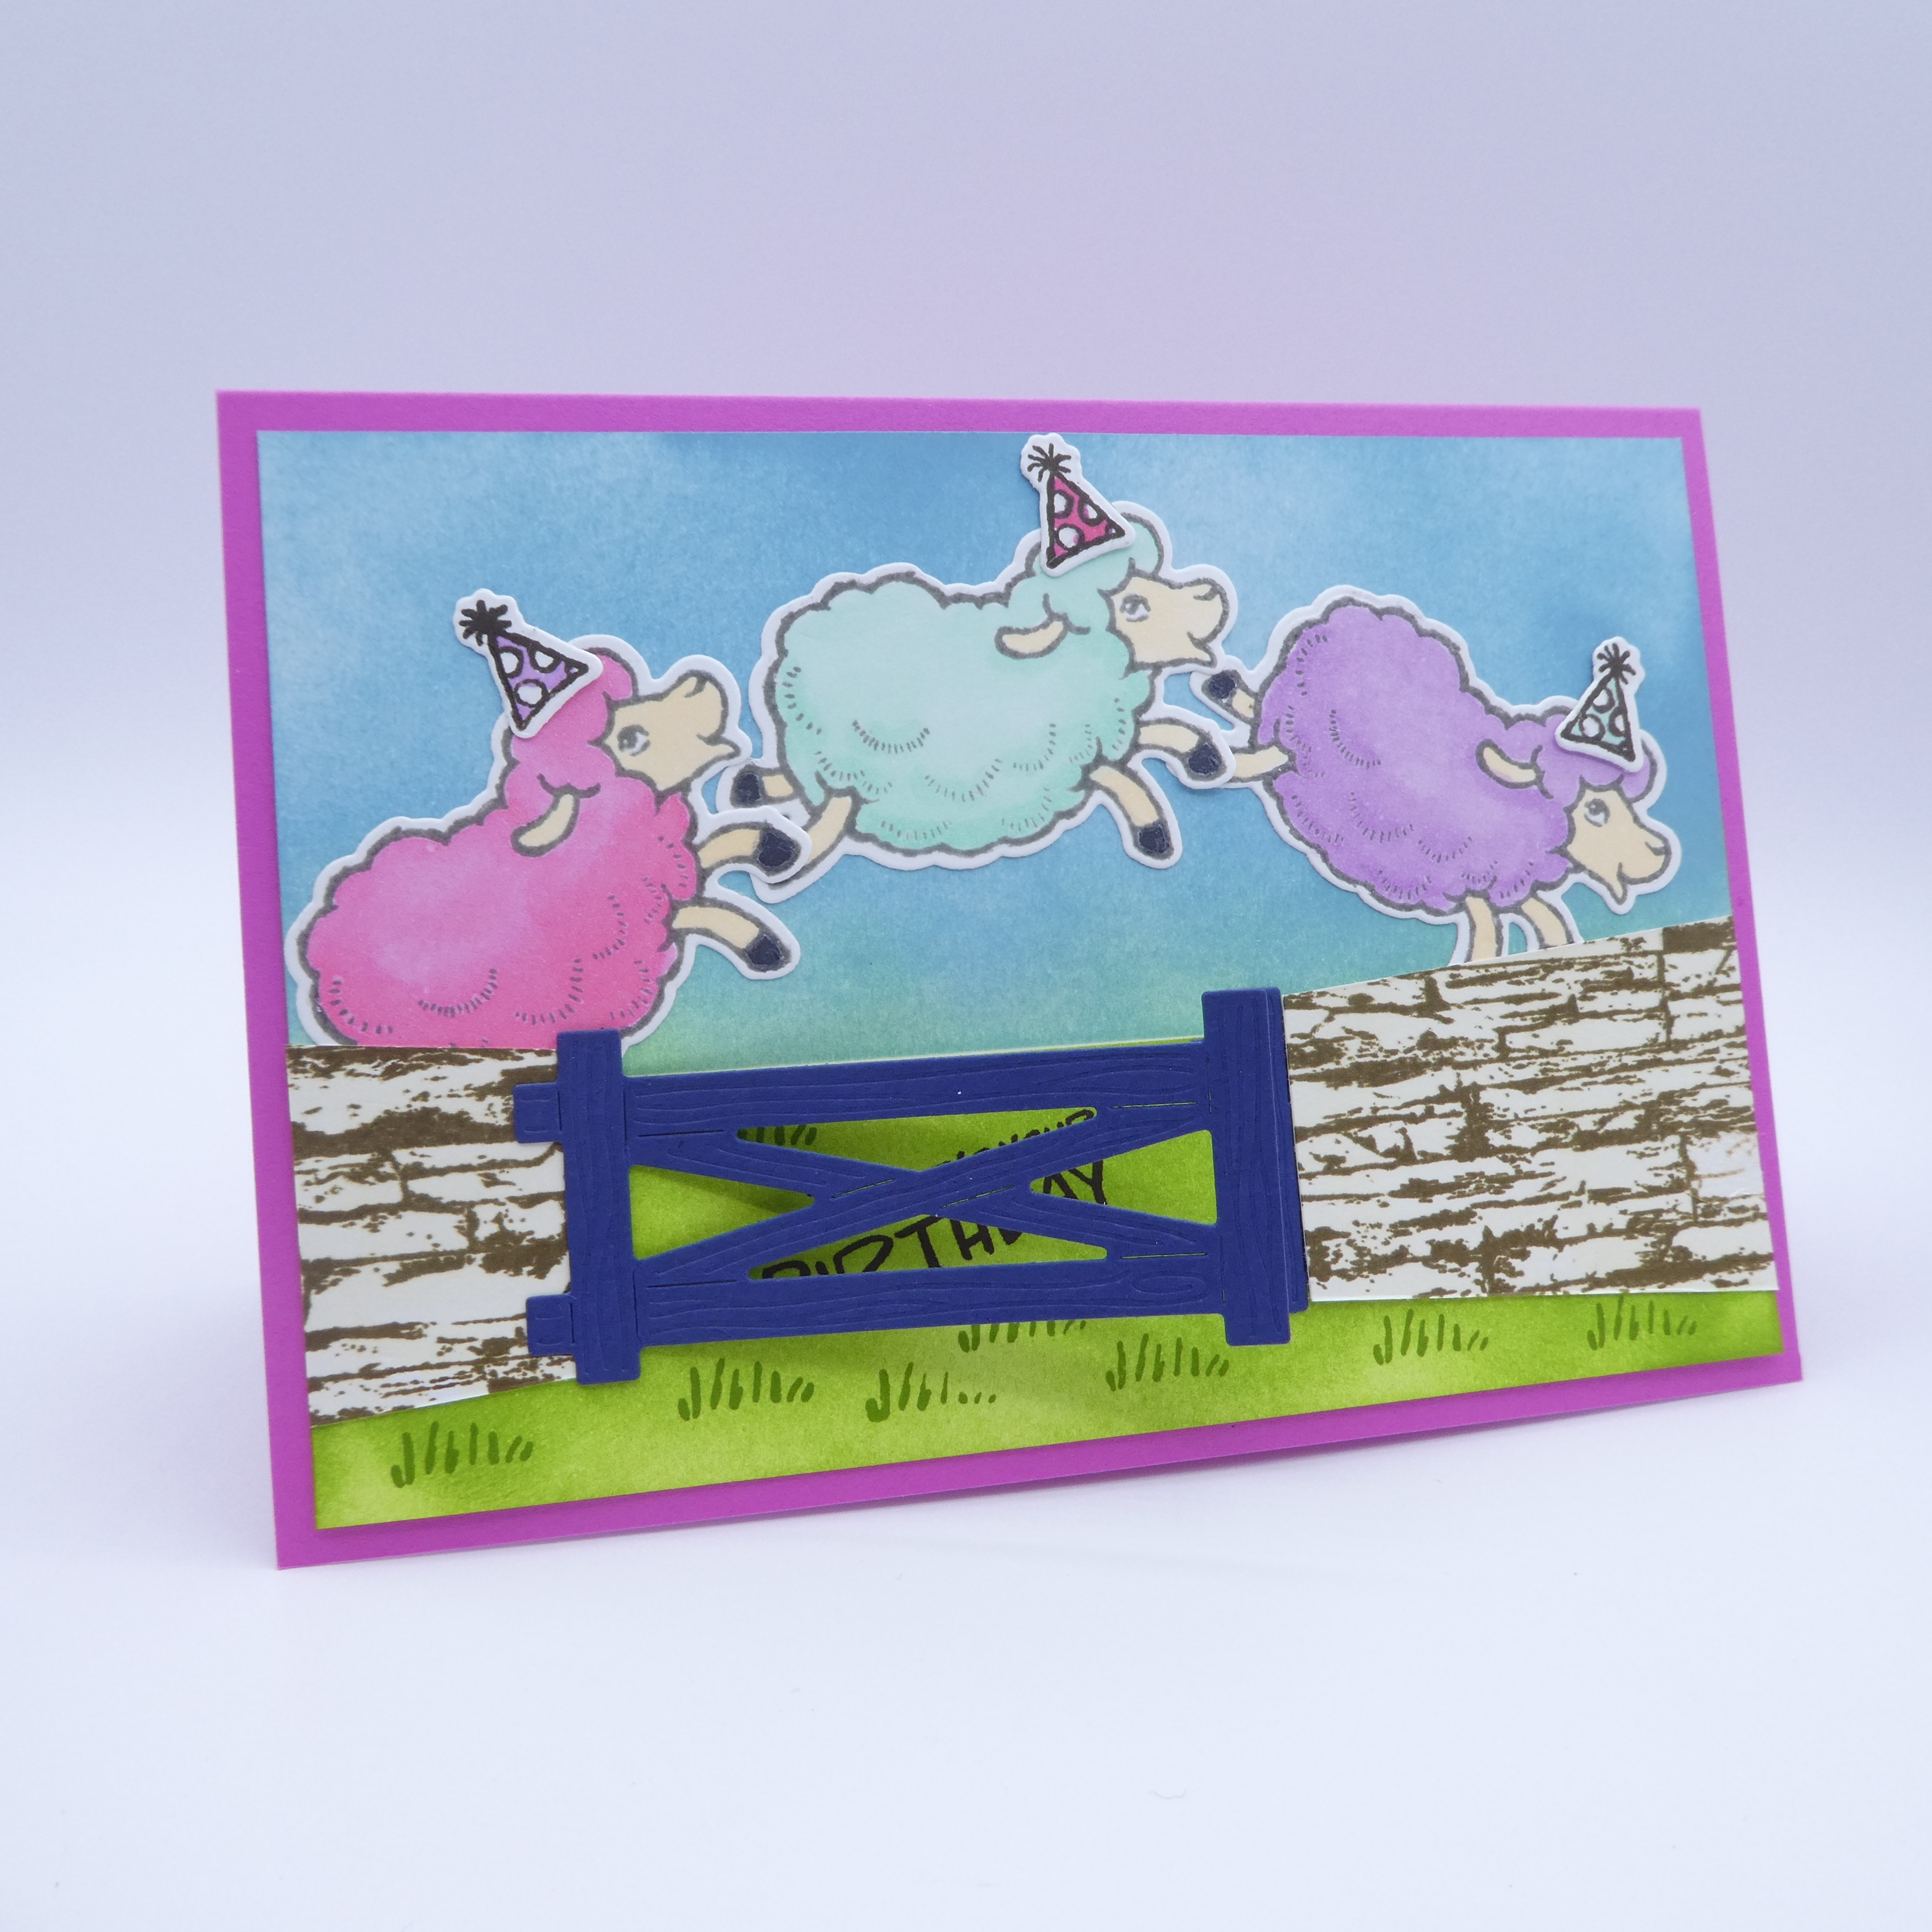
Vrolijke Schaapjes / Happy Sheep


Als je ook zo'n leuke verjaardagskaart wilt maken, klik dan rechts bovenin om naar mijn webwinkel te gaan. Onderaan vind je een lijst met de gebruikte materialen.


Hey, hey!

Een vrolijke verjaardagskaart in heldere kleuren. Schaapjes die springen van vreugde, wie wil dat nou niet op zijn verjaardag?

A happy birthday card in bright colours. Sheep that are jumping for joy, who wouldn't want that on their birthday?

Het hek kan open zodat je de verjaardagwens kunt lezen en ik heb het muurtje met perspectief gemaakt. Dat zag er gewoon beter uit.

The gate can be opened to reveal the birthday wishes and I have given the wall some perspective for a better look.


Basiskaart

Base Card

Magenta Madness kaartkarton 15,2 x 21 cm, korte zijde boven ril op 10,5 cm

Magenta Madness cardstock 6" x 8¼", short side top score at 4"

Mat

Mat

Basic White 14,6 x 9,9 cm

de horizon zit op 3,8 cm vanaf de onderkant

Basic White 5¾" x 3"

the horizon starts at 1½" from the bottom

Muurtje

Wall

strook van 4,5 cm, snijd over de helft en snijd vier keer 0,6 cm van de hoekjes af

1¾" strip, cut in half and cut off ¼" on four corners


Gebruikte materialen / Materials used

kaartkarton A4

 Basic White, Magenta Madness, Night of Navy

cardstock

stempelset

Counting Sheep (Sale-a-Bration Aug - Sep 21)

Stacked Stone

stamp set

stansen

Sheep Dies / Schaapjesstansen (Sale-a-Bration Aug - Sep 21)

dies

Stampin' Blends

colours used in this project: Basic Black Dark, Fresh Freesia Dark & Light, Pale Papaya Light, Polished Pink Dark & Light, Pool Party Dark & Light

Stampin' Blends

lijm

Multi-purpose Liquid Glue / Multifunctionele Vloeibare Lijm

Stampin' Seal+  / Seal+ Lijmroller

Tear & Tape Adhesive / Tear &Tape Plakband

adhesive

gereedschap

Blending Brushes / Blendingborstels

Bone Folder / Vouwbeen

Clear Block / Transparantblok: A, B, D

Grid Paper / Rasterpapier

Heat Tool

Paper Snips / Papierschaar

Paper Trimmer / Papiersnijmachine

Simply Shammy

Stampin' Cut & Emboss Machine / Stans- en Embossing Machine

Stampin' Emboss Powders Basics (clear) / Embossingpoeder in basistinten (transparant)

Take Your Pick / Precisiepen Voor Oppakgemak

tools

inkt

Classic Stampin' Pad / Klassiek Inktkussen in:

Balmy Blue, Crumb Cake, Early Espresso, Granny Apple Green, Smoky Slate, Soft Suede

ink


vrijdag 16 juli 2021

Stellar Birthday Snoepdoosje / Stellar Birthday Sweeties Box


Als je zo'n leuk snoepdoosje wilt maken, klik dan rechts bovenin om naar mijn webwinkel te gaan. Onderaan vind je een lijst met de gebruikte materialen.


Hey, hey!

Ik zat wat te spelen met het ontwerp voor deze sluiting, toen vond ik dat hij leek op een raket in de James Bondfilm You Only Live Twice. Ken je die scene nog? Toen kreeg ik het idee van een ruimtevaartthema. Daar past natuurlijk de stempelset Stellar Birthday bij en voor de traktatie erin uiteraard vliegende schotels. Ik was vergeten hoe lekker die zijn…

I was fiddling around a little with the design for this closure, then it reminded me of a rocket in the James Bond film You Only Live Twice. Do you remember that scene? Then I got the idea of a space theme. Which of course calls for the stamp set Stellar Birthday and for the treat in the box flying saucers, naturally. I had forgotten how yummy these are…

De afmetingen zijn 6,4 x 6,4 x 7,6 cm ( de gevouwen bovenkant niet meegerekend).

The dimensions are 2½" x 2½ x 3" (without the folded top).


Er zijn geen stansen bij Stellar Birthday, dus wilde ik de afbeeldingen uitknippen, maar bij het hondje lukte dat niet omdat ik het touwtje waar zijn bot aan zit niet geknipt kreeg. In dat geval moet je een bredere rand knippen, maar dat zag er weer niet uit op het kaartkarton. Toen kreeg ik het idee de brede rand te kleuren met een Stampin' Blend en dat was de oplossing.

Stellar Birthday doesn't have matching dies, so I decided to fussy-cut the images, but with the dog I got into trouble because I just couldn't get the string that's attached to his bone right. In such a case you can only cut with a wider edge, but that didn't look right on my cardstock. Then I got the idea to colour the wide edge with a Stampin' Blend and that did the trick.

Soms duurt het even voordat ik tevreden ben over een project. Dat wil zeggen, tevreden genoeg om het je te willen laten zien.

Sometimes a project takes several attempts before I am satisfied with it. Satisfied enough to show you, that is.


Je hebt nodig van de Wel Verdraaidstansen:

-       de sterretjes, 5 maal in Koper- of Goudfolievellen

-       wolkjes, 4 maal in Zilverfolievellen

You will need from the Give it a Whirl dies:

-       the stars, cut 5 times in Gold or Copper Foil Sheets

-       clouds, cut 4 times in Silver Foil Sheets


Het doosje

The box

kaartkarton 26,9 x 15,9 cm

lange zijde boven, ril op 6,4 / 12,8 / 19,2 / 2,6 cm

zet een inkeping op: 3,2 / 9,6 / 16 / 22,4 cm

cardstock 10½" x 6¼"

long side top, score at 2½" / 5" / 7½" / 10"

put a notch at: 1¼" / 3¾" / 6¼" / 8¾"

korte zijde boven, ril op 3,8  en 11,4 cm

short side top, score at 1½" and 4½"


Gebruikte materialen / Materials used

kaartkarton A4

 Basic White, Misty Moonlight, Pacific Point

cardstock

Folievellen

Copper / Koper, Gold / Goud, Silver / Zilver

Foil Sheets

stempelset

Stellar Birthday

stamp set

stansen

Give it a Whirl / Wel Verdraaid

dies

Stampin' Blends

ik heb veel verschillende kleuren gebruikt, dat is ook een kwestie van smaak of wat je hebt. Ik geef hieronder een paar tips.

I have used many different colours, it's a matter of what you like or what you have. I am giving some tips below

Stampin' Blends


gezichtjes

Petal Pink Light

faces

wangetjes

Petal Pink Dark

cheeks

witte randen

Night of Navy Light

white edges


sierlint & sierband

Baker's Twine Essentials Pack / Bakkerstouw Basisset: White

ribbon &

trim

verpakking

3" x 9" Printed Gusseted Cellophane Bags / Bedrukte Cellofaanzakjes Met Zijvouw

packaging

lijm

Adhesive Sheets / Zelfklevende Vellen

Multi-purpose Liquid Glue / Multifunctionele Vloeibare Lijm

Tear & Tape Adhesive / Tear &Tape Plakband

adhesive

gereedschap

Bone Folder / Vouwbeen

Clear Block / Transparantblok: B, C, D

Grid Paper / Rasterpapier

Heat Tool

Paper Snips / Papierschaar

Paper Trimmer / Papiersnijmachine

Silicone Craft Sheet / Siliconen Onderlegger

Simply Scored Scoring Tool /  Simply Scored Riller

Simply Shammy

Stampin' Cut & Emboss Machine / Stans- en Embossing Machine

Stampin' Emboss Powders Basics (clear) / Embossingpoeder in basistinten (transparant)

tools

inkt

Classic Stampin' Pad / Klassiek Inktkussen in: Early Espresso

Versamark Ink / Versamark Inkt

ink


dinsdag 13 juli 2021

Vetplantencadeautje / Potted Succulents Gift


Als je dit geschenkdoosje wilt maken, klik dan rechts bovenin om naar mijn webwinkel te gaan. Onderaan vind je een lijst met de gebruikte materialen.


Hey, hey!

Zijn deze potjes met vetplantjes niet geweldig? Ik heb ze gevonden bij de Xenos. Mijn drie kleine (nep) vetplantjes zijn voor een cadeautje en natuurlijk wilde ik daar een leuke verpakking voor maken.

Aren't these the cutest little potted succulents? I found them at Xenos, I hope there's a Xenos store where you are. My three (artificial) little succulents are for a present and naturally I just had to make some cute packaging for them. 

Het doosje bestaat uit twee stukken kaartkarton die aan elkaar geplakt zijn. De maten van het doosje zijn 16,5 x 5,7 x 10,2 cm.

The box consists of two pieces of cardstock adhered together. The box measures 6½" x 2¼" x 4".


Doosje

Box

Soft Succulent kaartkarton 23,5 x 19,4 cm, bestempel en kleur met Vingersponsjes.

Soft Succulent cardstock 9¼" x 7" , stamp and colour with Sponge Daubers.

lange zijde boven, ril op 16,5 en 22,2 cm

korte zijde boven, ril op 3,5 en 13,7 cm

long side top, score at 6½"  and 8¾"

short side top, score at 1" and 5"

Ik vind het makkelijker eerst het gat te snijden en het Transparant Vel te plakken voordat ik vouw en knip.

I have found it is  easier to first cut the hole and adhere the Window Sheet before folding and cutting.


Het gat snijden

Cutting the hole

leg de korte zijde boven met de plakflap onder, zet dan markeringen op  5,4 en 11,8 cm

put the short side top and the glue flap at the bottom, then mark at 2" and 4"

leg in de Papiersnijder met de lange kant boven en snijd tussen markeringen op 1,9 en 14,6 cm

snijd dan tussen de gesneden lijnen op  5,4 en 11,8 cm

put in the Trimmer with the long side top and cut between the markings at ¾ and 5¾"

then cut between the cut lines at 2" and 4"

Bewaar de uitgesneden stukjes, daar kun je een kaartje mee maken.

Save the cut-outs, you can make a tiny card with them.


Plak twee stukjes Transparant Vel van 15 x 9,5 cm op de gaten om raampjes te maken.

Adhere two 6" x 3¾" pieces of Window Sheet on the holes to make windows.

Zet verder in elkaar zoals in het filmpje.

Assemble as in the video.


Gebruikte materialen / Materials used

kaartkarton A4

Soft Succulent

cardstock

Paper Basics

Transparante Vellen / Window Sheets

Paper Basics

stempelset

Simply Succulents

stamp set

pons

Detailed Trio / Drie Accenten

punch

sierlint & sierband

Flowers For Every Season Ribbon Combo Pack / Setje Bloem Voor Elk Seizoen Lint

Simply Elegant Trim / Simpelweg Stijlvol Sierband

ribbon & trim

lijm

Tear & Tape Adhesive / Tear &Tape Plakband

Mini Glue Dots / Mini Plakpuntjes

adhesive

gereedschap

Bone Folder / Vouwbeen

Clear Block / Transparantblok: B, C, E

Grid Paper / Rasterpapier

Paper Snips / Papierschaar

Paper Trimmer / Papiersnijmachine

Simply Scored Scoring Tool /  Simply Scored Riller

Simply Shammy

Sponge Daubers / Vingersponsjes

tools

inkt

Classic Stampin' Pad / Klassiek Inktkussen in:

Evening Evergreen, Fresh Freesia, Polished Pink, Soft Succulent

ink