vrijdag 25 oktober 2019

Geglazuurd Cakeje / Iced Cake


Als je dit geinige cakeje wilt maken, klik dan rechts bovenin om naar mijn webwinkel te gaan.
Onderaan vind je een lijst met de gebruikte materialen.
Hey, hey!
Wat vind je van mijn geglazuurd cakeje? Het is een leuke versiering voor op de kersttafel. Net zoals bij een cakeje van een luxe bakker, heb ik het verpakt in een mooi doosje. Het is gemaakt met de Mini Curvy Keepsakes mallen en de bijpassende stempelset Tiny Keepsakes. Het past precies in een Clear Tiny Treat Box. Een mooi labeltje eraan met een strikje en je hebt een schattige versiering of een leuk cadeautje.
How do you like my iced cake? It would make a lovely decoration for a Christmas dinner table. Just like at some fancy baker's, I've wrapped it in a beautiful box. The cake has been made with the Mini Curvy Keepsakes dies and the matching Tiny Keepsakes Stamp Set. It just fits inside a Clear Tiny Treat Box. Put a nice label on with a bow and you have a sweet decoration or a cute small present.
Voor het doosje:
For the box:
Clear Tiny Treat Box
Voor het kleedje onderin: bestempel met Blueberry Bushel inkt twee kanten van een stukje Whisper White met het ruitjespatroon. Knip een vierkantje van 5,1 x 5,1 cm.
Clear Tiny Treat Box
For the doily on the bottom: stamp the check pattern on both sides of a piece of Whisper White in Blueberry Bushel ink. Cut a 2" x 2" square.


Voor het cakeje:
For the cake:
Snijd het doosje uit Soft Suede Card Stock van 14 x 14 cm. Bestempel met de sneeuwvlok in Soft Suede.
Snijd vier maal Whisper White van 7 x 5,7 cm, snijd een hoekje ervan af. Snijd de vier uiteinden van de Mini Curvy Keepsakes box voor het glazuur. Knip met je Paper Snips het druipende glazuur en plak het vast met Multipurpose Liquid Glue. Vouw op de rillijnen, krul voorzichtig met je Bone Folder en zet het doosje in elkaar.
Cut the box from a 5½" x 5½" piece of Soft Suede Card Stock. Stamp with the snowflake in Soft Suede.
Cut four pieces of 2¾" x 2¼" in Whisper White Card Stock, cut off a corner. Die cut the four outer ends of the Mini Curvy Keepsakes box to cut the icing. Hand cut dripping bottom with your Paper Snips and adhere using Multipurpose Liquid Glue. Fold on score lines, gently curl with Bone Folder and put box together.


Snijd besjes in Real Red Card Stock en groen in Garden Green. Voor de besjes heb ik de oude ¼"pons gebruikt, maar je kunt heel goed de besjes nemen van de Cup of Cheer mallen. Het groen is van de Mini Curvy Keepsakes mallen, maar ook hier kun je prima de hulstblaadjes nemen van de Cup of Cheer.
Geef de besjes een realistisch uiterlijk met de Basic Black Stampin' Write Marker. Plak groen en besjes vast met Mini Glue Dots.
Cut berries in Real Red Card Stock and greenery in Garden Green. For the berries I've use the old ¼" punch, but you could also use the berries in the Cup of Cheer dies. The greenery is from the Mini Curvy Keepsakes dies, but here again you could use the holly leaves from Cup of Cheers.
Give the berries a realistic look using the Basic Black Stampin' Write Marker. Adhere greenery and berries to the cake with Mini Glue Dots.


Voor het labeltje
For the label:
Behandel een stukje Blue Berry Bushel Card Stock met je Embossing Buddy, stempel een tekst in Versamark, bestrooi met Stampin' Emboss Powder White en smelt met je heat tool.

Snijd uit met een labeltje van Mini Curvy Keepsakes mallen. Strik het labeltje vast aan de Clear Tiny Treat Box met een stukje Solid Baker's Twine in Whisper White.
Treat a piece of Blueberry Bushel Card Stock with an Embossing Buddy, stamp a sentiment in Versamark, sprinkle Stampin' Emboss Powder White on top and heat set with heat tool.

Cut with a label from the Mini Curvy Keepsakes dies. Tie the label to the Clear Tiny Treat Box using a length of Solid Baker's Twine in Whisper White.


De gebruikte materialen / Materials used:

Basic Black Stampin' Write Marker
Blueberry Bushel Card Stock
Blueberry Bushel Classic Stampin' Pad
Bone Folder
Clear Tiny Treat Box
Cup of Cheer dies
Embossing Buddy
Garden Green Card Stock
Mini Curvy Keepsakes dies
Mini Glue Dots
Multipurpose Liquid Glue
Paper Snips
Real Red Card Stock
Soft Suede Card Stock
Solid Baker's Twine Whisper White
Stampin' Emboss Powder White
Tiny Keepsakes Stamp Set
Versamark Pad
Whisper White Card Stock


vrijdag 18 oktober 2019

Slank schuifdoosje / Tall, Skinny Slider Box


Als je dit leuke schuifdoosje wilt maken, klik dan rechts bovenin om naar mijn webwinkel te gaan.
Onderaan vind je een lijst met de gebruikte materialen.
Hey, hey!
Een project voor de kersttafel. Het Feels Like Frost Specialty Designer Series Paper is zo mooi! Het is dit schuifdoosje geworden. De maten zijn 14 x 5,1 x 1,9 cm en de twee helften passen precies. Er hoefde alleen nog wat Seaside Spray  ¼" Metallic Ribbon bij om het af te maken. En, natuurlijk, nog wat Ice Stampin' Glitter op een Frosted Frames sneeuwvlok. Ik houd van blinkend.
A project to decorate the table at Christmas dinner. The Feels Like Frost Specialty Designer Series Paper just begged to be used for this slider box. It measures 5½" x 2" x ¾" and both halves fit like a glove. I only had to add some of the Seaside Spray  ¼" Metallic Ribbon to finish it off. And, of course, some Ice Stampin' Glitter on a Frosted Frames snowflake. I like sparkly.
Onderaan kun je zien wat ik allemaal gebruikt heb.
You can see the materials that I've used listed below.


Buitenhelft
Outer Half
DSP 12,7 x 15,2 cm
15,2 zijde boven, ril op 5,1 / 7,0 / 12,1 / 14 cm
12,7 zijde boven, ril op 1,9 cm - let erop hoe je het papier neerlegt als je wilt dat het in een bepaalde richting gaat - zie het filmpje
DSP 5" x 6"
6" side top, score at 2" / 2¾" / 4¾" / 5½"
5" side top, score at ¾" - mind how you position your paper if you need it to go in a certain direction - please see the video


Binnenhelft
Inner Half
DSP 15,2 x 14,9 cm
14,9 zijde boven, ril op 4,9 / 6,6 / 11,6 / 13,3 cm
DSP 6" x 5"
5" side top, score at 1-15/16" / 2" / 4-9/16" / 5¼"
Or use my fool proof scoring method and first score your 2" and 5¼" score lines. Move the paper to the right and score at 2" and 4".
15,2 zijde boven, ril op 1,75.
6" side top, score at 11/16".
Or the fool proof method: put a score mark at 1", move the paper to the right and score at ¾".
Gebruikte materialen  / Materials Used:
A4 cardstock in Seaside Spray
A4 Thick cardstock in Whisper White
Feels Like Frost Specialty Designer Series Paper
Frosted Frames dies
Ice Stampin' Glitter
Mini Glue Dots®
Multipurpose Liquid Glue
Seaside Spray  ¼" Metallic Ribbon
Tear & Tape Adhesive


vrijdag 11 oktober 2019

Pinguïns maken ook plezier! / Us Penguins Are Having Fun!


Hey, hey!
Mijn eerste kerstkaart voor 2019. Ik begin op tijd, dat moet ik wel, anders heb ik er nooit voldoende gemaakt wanneer ik ze begin december verstuur.
My first Christmas card for 2019. I always start on time, I have to, because else I will never have enough cards made when I send them at the beginning of December.
Deze kaart met de leuke pinguïns is snel te maken. Je kunt er makkelijk veel van maken en ook de bijpassende envelop is makkelijk in veelvoud te maken met de Stamparatus.
This card with the cute penguins can be made quickly. It is easily mass-produced with the Stamparatus and this goes for the matching envelopes as well.


Mijn inspiratie kwam van een filmpje dat ik zag waar een pinguïn op zijn gat glijdt, ik zag de pinguïns van de stempelset Playful Penguins  meteen een glijbaan afgaan. Pinguïns maken ook plezier!
I got my inspiration from a video that I saw where a penguin slid onto its bum, I immediately saw the penguins from the stamp set Playful Penguins go down a slide. Us Penguins Are Having Fun!
De basiskaart is een vel Whisper White Thick cardstok A4, in de lengte over de helft gesneden op 10,5  cm en op de helft gerild op 14,85 cm.
The base card is an A4 sheet of Whisper White Thick cardstock, =cut in half lengthwise at 4⅛" and scored at 5⅞".
De mat is Whisper White, 9,5 x 14 cm.
The mat is Whisper White, 3¾" x 5½".
Gebruikte Materialen / Materials Used
Memento Tuxedo Black
Seaside Spray Classic Stampin' Pad
Shaded Spruce Classic Stampin' Pad
Pumpkin Pie Dark Stampin' Blend
Daffodil Delight Dark Stampin' Blend
Seaside Spray Dark Stampin' Blend
stempelset Playful Penguins stamp set
stempelset Snowman Season stamp set


zaterdag 5 oktober 2019

We'll Walrus be Friends Waterfall Card for World Card Making Day


Hey, hey!
Ik had al vaker een zogenaamde Waterfall Card gezien en wilde er ook eens zelf eentje maken. Een waterval - de geinige walrusjes en visjes uit de stempelset We'll Walrus Be Friends - ze passen mooi bij elkaar en natuurlijk is deze kaart helemaal op thema voor World Card Making Day want dat is het vandaag! 
I had seen so-called Waterfall Cards before and I wanted to make one myself. A waterfall - the cute walruses and tiny fish I from the stamp set We'll Walrus Be Friends - they go together well and of course this card is totally on theme for World Card Making Day, because that's today! 
Na eerst wat pogingen om uit te zoeken wat voor mij het makkelijkste werkt, ben ik tot deze kaart gekomen. Vind je hem niet enig?
After some fiddling around to see what would work most easily for me, I have come up with this card. Don't you think it's adorable?


Gebruikte materialen / Materials used:
We'll Walrus Be Friends
Beauty Abounds

Stampin' Blends:
Flirty Flamingo Light & Dark
Gray Granite Light & Dark
Seaside Spray Light & Dark
Pumpkin Pie Light & Dark
Pretty Peacock Light & Dark
Memento Tuxedo Black ink
Pacific Point Classic ink
Seasonal Layers dies
Stitched Shapes vierkant / square
Delightful Tag Topper
½" Circle Punch


Kaart:
Card:
-       basiskaart Seaside Spray, een vel A4 in de lengte gesneden op 10,5 cm, gerild op 14,85 cm
-       base card Seaside Spray, half an A4 sheet cut lengthwise at 4" and scored at 5"
-       Seaside Spray mat, 9,3 x 14,3 cm
-       Seaside Spray mat, 3⅝" x 5⅝"
-       strook Pacific Point papier van 15,3 x 5 cm voor de golven
-       strip of Pacific Point cardstock 6" x 2" for the waves
-       binnenkant kaart grootste cirkel Stitched Shapes in Whisper White, versierd
-       inside card largest circle Stitched Shapes, decorated


Watervalmechanisme:
Waterfall mechanism:
-       strook Seaside Spray 20,3 x 5 cm
-       gerild op 11,1 en 13,6
-       omkeren en op 12,4 en 14,9
-       strip of Seaside Spray 8" x 2"
-       scored at 4" and 5"
-       flip and score at 4⅞" and 5"
-       strook Seaside Spray om vast te plakken van 1,2 x 14,6 cm
-       strip of Seaside Spray to glue down ½" x 5¾"
-       vier Whisper White vierkantjes gesneden met de op een na grootste snijmal van Stitched Shapes, versierd
-       four Whisper White squares die cut with the second largest of the Stitched Shapes, decorated


Diversen / Miscellaneous
10 cm lint / 4" ribbon
Solid White Baker's Twine
Sponge Dauber


vrijdag 4 oktober 2019

Vierkante pompoenen / Square Pumpkins


Hey, hey!
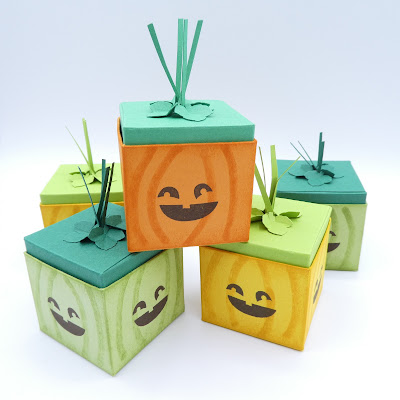
Hoe vind je mijn vierkante pompoenen? Deze blogpost gaat er ook over hoe je vanuit een fout een briljant idee krijgt.
How do you like my square pumpkins? This blog post is also about how you can turn a mistake into a brilliant idea.


Kijk maar eens naar deze foto. De lila pompoen is het prototype. Daar was ik tevreden over, toen ben ik gaan snijden, vouwen, stempelen, sponge dauberen en ga maar door. In veelvoud. Totdat ik bij het in elkaar zetten van de dekseltjes ontdekte dat ik het gezichtje ondersteboven had gestempeld. Bij álle deksels.
Just have a look at this picture. The lilac pumpkin is my prototype. I was happy with that, so started cutting, folding, stamping, sponge daubering and so on. Multiples. Until I discovered when assembling the lids that I had stamped the face upside down. On all lids.
Ik heb besloten mijn doosjes dan maar om te keren en van de bodem het dekseltje te maken. En ik vind ze nog leuker zo ook! Nou ja!
I then decided to upend my boxes and make the lids into the bottoms. And guess what, I like them even better like this!


Bodem
Bottom
cardstock 20,3 x 13 cm
lange zijde boven, ril op 4,75 / 9,5 / 14,3 / 19,1 cm
korte zijde boven, ril op 4,75 / 8,9 cm
cardstock 8" x 5"
long side top, score at 1" / 3¾" / 5" / 7½
short side top, score at 1" / 3½"


Deksel
Lid
cardstock 19,7 x 13,8 cm
lange zijde boven, ril op 4,65 / 9,2 / 13,8 / 18,4 cm
korte zijde boven, ril op 4,65 / 9,2 cm
cardstock 7¾" x 5-7/16 (= just a bit under 5½")
long side top, score at 1-13/16" / 3" / 5-7/16" / 7¼
short side top, score at 1-13/16" / 3"
Het stukje rechts is handig als je in inches werkt, met centimeters en millimeters heb je dit probleem niet.
FOOLPROOF WAY TO DEAL WITH 16th inches:
long side top, first score at 3" and 7¼" then move cardstock to the right and score at 1" and 5½"
short side top, first score at 3" then move cardstock to the right and score at 1"


First score the "normal" dimensions 3⅝" and 7¼"


Move your paper to the right like this and put in the score lines at 1⅞" and 5½"


Ik heb de onderstaande kleurencombinaties gebruikt / I have used the colour combinations listed below
Crushed Curry & Granny Apple Green
Pumpkin Pie & Call Me Clover
Pear Pizzazz & Shaded Spruce
Gezichtje is uit Fall Fest (niet meer in de collectie - Harvest Hellos is een alternatief in de Herfst/Wintercatalogus op blz. 49)
The face is from Fall Fest ( retired - Harvest Hellos is an alternative that is in the Autumn/Winter Catalogue on page 49)