donderdag 27 juni 2019

Verstevigd Pizzadoosje / Reinforced Pizzabox


Hey, hey!
Vandaag heb ik dit leuke, verstevigde pizzadoosje voor je. Ik zocht naar een manier om het Designer Series Paper dat eruit gaat op te werken en voor dit doosje heb je een vel 12" x 12" (30,5 x 30,5 cm) papier nodig, vandaar.
Today I have this cute reinforced pizza box for you. I was looking for a way I could use up the Designer Series Paper that will be discontinued shortly and for this box you need a 12" x 12" sheet of paper, so that's why.
Als je ook een wikkel wilt maken, heb je een stuk papier nodig van 26,5 x 8,25 cm.
If you also want to have a belly band, you will need a 10½" x 3¼" piece of paper.
De maten:
The measurements:
Let op de richting van het papier bij het snijden en het rillen - zie mijn tips in het filmpje.
Please pay attention to the direction of the paper when cutting and scoring - see my tips in the tutorial.
1 stuk DSP van 21,0 x 30,5 cm, van het overschot kun je het stukje snijden dat je in de bodem plakt, dat is 8,1 x 8,1 cm.
1 piece DSP of 8¼" x 12", you can use the left over to cut the bottom lining piece which is 3-3/16" x 3-3/16 (that's just a fraction smaller than 3¼" x 3¼").
Met de lange zijde boven, rillen op:
1,25 / 3,80 / 6,35 / 14,60 / 17,15 / 25,40 / 27,95 cm
With the long side top, score at:
½" / 1½" / 2½" / 5¾" / 6¾" / 10" / 11"
Met de korte zijde boven, rillen op:
1,25 / 3,80 / 6,35 / 14,60 / 17,15 / 19,70 cm
With the short side top, score at:
½" / 1½" / 2½" / 5¾" / 6¾" / 7¾"


Vouwen en knippen zoals in het sjabloon.
Fold and cut as in the template
Meet op 4,15 cm voor het gaatje en pons met de ½" circle punch.
Measure at 1⅝" for the thumb grip and punch using the ½" circle punch.


vrijdag 21 juni 2019

Opvouwbaar Geschenktasje / Fold-flat Gift Bag


Hey, hey!
Op blz. 61 van de nieuwe Jaarcatalogus staat dit leuke tasje. Ik vond het zulke mooie zijkanten hebben aan de bovenkant dat ik besloot het te proberen na te maken.
O
n page 61 of the new Annual Catalogue there's this sweet little bag. I really liked the neat sides at the top so I decided to try and case it.

Blz. 61 Jaarcatalogus / Page 61 Annual Catalogue


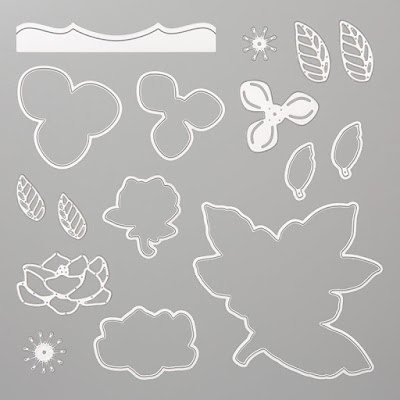
Ik vroeg me alleen af hoe ze die geschulpte rand voor elkaar gekregen hadden. Mijn dies waren niet groot genoeg, dus ik heb de Magnolia Memories Dies gebruikt.
I wondered how they'd managed the scalloped edge. My dies weren't large enough, so I used the die from the Magnolia Memories Dies instead.

Later ontdekte ik dat in de catalogus er een envelopje voor gebruikt was van de Scalloped Note Cards & Envelopes op blz. 168. Dat heb ik ook geprobeerd; ik vond alleen de zijkant dan niet mooi, dus ik houd het bij mijn eigen tasje.  
Later I discovered they'd used an envelope from the Scalloped Note Cards & Envelopes on page 168. I tried that as well; but frankly I didn't much like the sides of the bag, so I'm sticking to my own design.
Dat is ook een beetje groter en ik kan het gebruiken om Designer Series Paper dat niet meer in de collectie zit op te maken.
It is also just a little larger and I can use it to use up my retired Designer Series Paper.
Dit is wat ik gebruikt heb:
een stuk Designer Series Paper van 30,5 x 15,2 cm
Here's what I have used:
a 12" x 6"piece of Designer Series Paper 
lange zijde boven, rillen op 3,8 / 14,6 / 18,4 / 29,2 cm
long side top, score at 1½" / 5¾" / 7¼" / 11½"
korte zijde boven, rillen op 3,8 en 11,4 cm
short side top, score at 1½" and 4½"
met de korte zijde nog boven, vanuit de bodem op 5,7 cm met potlood een punt aftekenen in de beide zijpanelen

Als je het tasje zo wilt maken dat je het plat kunt vouwen en bewaren zet je onderaan tussen de 4e en de 5e rillijn - dus in het grote vlak - op 5,7 cm een extra rillijn.
Teken ook de diagonale rillijnen. Vouw alle rillijnen en loop ze na met het vouwbeen.
short side still top, from the bottom put a pencil line at 2¼" in both side panels
If you want the bag to fold flat for easy storage, at 2¼" you put an extra score line at the bottom between the 4th and the 5th score lines - so in the larger panel.
Draw the diagonal score lines. Fold and burnish all score lines with the bone folder.
Knip alles en zet het tasje in elkaar zoals in het filmpje. Zonder mijn vergissing van de Tear & Tape, uiteraard…
Cut and assemble the bag as in the tutorial. Without my mistake with the Tear & Tape, of course…
Het stukje card stock dat ik achter de flap heb geplakt is 5,7 x 11,4 cm. Ik heb een stuk lint gebruikt van 41 cm.
The piece of card stock that I have adhered to the back of the flap measures 2¼" x 4½". I have used a 16" length of ribbon.


zaterdag 15 juni 2019

Flip-top Box


Hey, hey!
Deze keer een doos waar je zelfgemaakte kaarten in kunt bewaren. Zo'n doos geef ik weg aan mensen die bij mij kaarten komen maken.
Today I have a box in which you can keep handmade cards. I give these boxes to guests who come over to my house to make cards.
Ik gebruik daarvoor ook vaak papier dat niet meer in de collectie zit, dat is te mooi om niet op te maken.
I often use retired paper for this, it's too beautiful not to use after all.
Wat heb je nodig?
What do you need?
Voorkant
1 vel cardstock  27,9  x 17,2 cm
korte zijde boven rillen op 5,7 cm
lange zijde boven rillen op 5,7 en 22,2 cm
Front
1 piece of 11"  x 6¾" card stock
short side top, score at 2¼"
long side top, score at 2¼" and 8¾"
Achterkant en flip-top
1 vel cardstock 27,9 x 20,9 cm
korte zijde boven rillen op 2,2 en 18,7
lange zijde boven rillen op 5,7 / 17,1 / 22,8 cm
Back and flip-top
1 piece of 11" x 8¼" card stock
short side top, score at ⅞" and 7⅜"
long side top, score at 2¼" / 6¾" / 9"

Als je met matten wilt versieren heb je een vel Designer Series Paper  nodig van 30,5 x 30,5 cm gesneden in:
2 stukken 15,2 x 10,1 cm (voor- & achterkant)
1 stuk 15,2 x 4,4 cm (bovenkant)
1 stuk 15,2 x 3,8 cm (flap voorkant)
2 stukken 10,1 x 4,4 cm (zijkanten)


If you want mats to decorate, you need a piece of 12" x 12" Designer Series Paper cut into:
2 pieces 6" x 4" (front & back)
1 piece 6" x 1¾" (top)
1 piece 6" x 1½" (flap on front)
2 pieces 4" x 1¾" (sides)

Om de binnenkant te versieren - naar keuze: 
1 stuk 15,2 x 10,1 cm (achterkant)
1 stuk 15,2 x 4,4 cm (bovenkant)
1 stuk 15,2 x 3,8 cm (flap)
To decorate the inside - optional:
1 piece 6" x 4" (back)
1 piece 6" x 1¾" (top)
1 piece 6" x 1½" (flap)
Ongeveer 40 cm lint.
About 16" of ribbon.


zaterdag 8 juni 2019

Flip Flap Kaart / Flip Flap Card


Hey, hey!
Met de stempelset Cuckoo For You kun je niet alleen die ontzettend leuke koekoeksklok maken.
The Stamp Set Cuckoo For You doesn't only make that so incredibly cute cuckoo clock.


Het mechanisme dat erbij hoort is zo veelzijdig. Kijk maar eens naar deze voorbeelden. Ik heb er maar de naam Flip Flap Kaart aan gegeven.
The mechanism that goes with it is so versatile. Just have a look at these examples. I'm calling them Flip Flap Cards.


Het zijn nog prototypes, maar je krijgt wel een idee.
They're still prototypes, but they'll give you some idea.
Ik heb gebruikt
I have used

This Little Piggy
Around The Corner
Cuckoo Clock Dies
Van Alles Wat (Itty Bitty Greetings)
Balloon Bouquet Punch
Gorgeous Grape Stamp Pad
Granny Apple Green Stamp Pad
Balmy Blue Stamp Pad
½" Circle Punch
Sponge Brayers
Purple Posy Card Stock
Pretty Peacock Card Stock
Rococo Rose Card Stock
Thick Whisper Card Stock
Whisper White Card Stock
Petal Pink Dark & Light Blends
Flirty Flamingo Light Blend
Granny Apple Green Light Blend
Journaling Pen 0,5

De basiskaart is Thick Whisper White, gesneden op 10,5 cm en gerild op 14,85 cm.
De mat is 9,8 x 14,2 cm.
The base card is Thick Whisper White, cut at 4"  and scored at 5".
The mat is Whisper White, 3" x 5".
Het varkentje is linksonder gestempeld 2 cm vanuit links en 3 cm vanuit de bodem.
The piggy has been stamped in the bottom left corner, ¾" from the left and 1¼" from the bottom.


donderdag 6 juni 2019

Vrolijke Vaasjes / Cheerful Vases


Hey, hey!
Deze kaart begon als een éénlaagskaart, maar omdat je met de Stampin' Blends aan de achterkant de inkt ziet, is het toch een kaart op een basiskaart geworden.
Daardoor springen de kleuren nog beter in het oog en ik heb besloten mijn ontwerp dan ook Vrolijke Vaasjes te noemen. 

This card started out as a one-layer card, but because with the Stampin' Blends the ink bleeds through it morphed into a card on a base card.
Because of this the colours pop even more and that's why I have decided to call it Cheerful Vases. 
De stempelset heet Varied Vases, ik heb de snijmal van de Magnolia Memories Dies gebruikt voor de gesponste randen.
I've used the Varied Vases stampset and the die from the Magnolia Memories Dies to sponge the edges.


De onderkaart is Gorgeous Grape, een halve A4 in de lengte gesneden en over de helft gevouwen.
The base card is Gorgeous Grape, an full sheet cut in half lengthwise and folded in half.
De beide Whisper White matten (voor de voorkant en binnenkant) zijn 9,4 x 13,6 cm, de helft is dan 4,7 cm.
Both Whisper White panels (for the front and the inside of the card) are 3¾" x 5½", the half-way mark is then 1⅞".
For letter the sizes are 3¾ x 5", the half-way mark is 1⅞" as well.


Dwars kan ook / Landscape is also an option 


De kleuren / colours
Gesponst / sponged: Melon Mambo Classic Stampin' Pad
Stampin' Blends:
Old Olive Light & Dark
Flirty Flamingo Light & Dark
Mango Melody Light & Dark
Pineapple Punch Light & Dark
Highland Heather Light & Dark
Crumb Cake Light


Magnolia Memories Dies


De lijnen voor het sponsen / The lines for the sponging:
1e keer
2e keer
3e keer
1st time
2nd time
3rd time
5 lijntjes / lines
4 lijntjes / lines
3 lijntjes / lines
= 1¼"
= 1"
= ¾"
Ik heb de vazen ook nog bestempeld met Versamark, bestrooid met Stampin' Emboss Powder Clear en dit met de föhn gesmolten.
I've also stamped the vases in Versamark and heat-embossed them with Stampin' Emboss Powder.